Email
lists are very important for any business. Having targeted email lists is
one of the best assets a business can have. So, it is very important to create
your own niche-specific targeted email lists.
In
order to create your own email lists, you need to collect the emails of your site
visitors and for that, it is very important that your site should have an Email
Subscription Form.
There
are many email marketing platforms available that you can use to save your
email lists and send automated emails to your lists. Some of the best and most
popular email marketing platforms are as follow:
1.
MailChimp
2.
GetResponse
3.
Aweber
4.
Sendinblue
Also, These email
marketing platforms offer a free tier of service for new users. As a beginner,
you can try any of these platforms.
In this step-by-step guide, we will teach you how to add an Email Subscription Form to
your WordPress website so that you can easily collect your site visitor's
email.
In this tutorial, we will use MailChimp and wpforms WordPress plugin. We will create an Email Subscription Form using wpforms WordPress plugin and integrate it with MailChimp to save subscriber’s emails in the email list. So, let's get started.
Steps to create Email Subscription Form in WordPress
Step 1: Install and Activate wpforms WordPress Plugin
The first step is
to install and activate wpforms WordPress plugin.
Step 2: Install and activate the MailChimp Addon
Navigate to the addons section in wpforms plugin. In addons, install and activate the MailChimp addon.
Step3. Create a new form
After activating
the plugin and MailChimp addon, It's time to create a new form.
Now go to add new to create a new form. Name your new form and select the Newsletter signup form from the template section.
Step 4. Customize your Newsletter Signup Form
The next step is
to customize your newsletter sign-up form.
After creating a new form, you'll see a drag and drop form builder that allows you to customize your form. You can add, remove or modify form fields according to your needs just by dragging the form elements. When you are satisfied with your form customization, click the save button to save your form.
Step 5: Connect MailChimp to your form
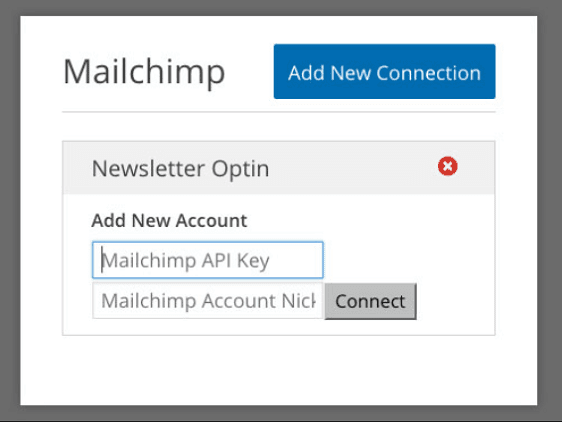
Now connect your form with your MailChimp account. For that, Go to Marketing > MailChimp.
Click on Add
New Connection button.
After that,
you'll get a prompt asking for a connection nickname. Enter any suitable name
for this connection and press ok.
In order to
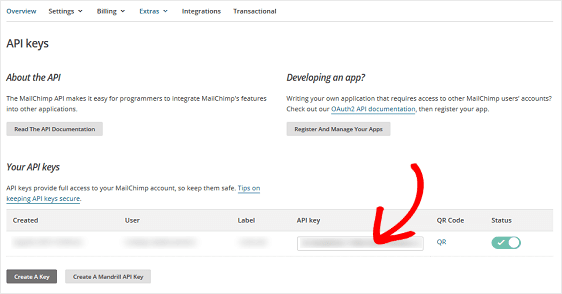
complete the connection, you need an API key from your MailChimp account.
You can get the API Key by logging in to your MailChimp account. In your profile, go to Extras and then select API Keys.
Now, you can create a new MailChimp API Key. After generating the keys, copy the API Key and paste it into wpforms. Click Connect to complete the connection.
Step 6. Configure MailChimp Settings
After the
successful connection, you need to configure your MailChimp account settings.
The following settings are there:
1. Select your
MailChimp Account
2. Select the
email list where you want to save your subscriber's email.
3. Select the
form fields in which you want to save the collected data in your email lists.
4. Enable
Conditional logic if you want to set any conditions.
5. Enable double
optin option.
After configuring all these settings, press save button.
Step 7: Configure Notifications for your Subscription Form
Whenever someone
subscribes to your newsletter, you'll get a notification automatically.
You can set
notifications in the settings of wpforms plugin. Go to settings and select
Notifications.
You can turn notifications on or off. Also, you can select on what email you'll get the notifications. By default, it is set to admin email. You can also change it to any other email address. And also, you can change the email template and subject from the settings.
Step 8: Configure Confirmations for your subscription form
Confirmations mean to let the user know that their subscription form has been successfully submitted.
There are 3 types of Confirmations that you
can set.
1.
Message: If you just want to show a
confirmation message to the user, you can select this confirmation and you can
customize your success message.
2.
Show
Page: If you
want to show a thank you page to your site visitors upon the successful
submission then you can use this confirmation. Here you can redirect the user
to a specific webpage when they submit their email.
3.
Go
to URL (Redirect): If
you want to redirect the user to any other website, then you can select this
option and redirects the user to your specific URL upon submission of the
email.
Step 9: Add Email Subscription Form to Your Site
After creating
the subscription form, it needs to be added to your website.
You can add your
form as a sidebar widget or in a separate post or page.
You'll get the
option of add a form when you create or edit a post or page. Click on the Add
Form button and select your form from the dropdown menu. Save changes and
publish your post or page.
Congratulations, now you have your own MailChimp Email subscription form on your WordPress website.
That’s complete the step-by-step
guide. I hope this guide helps you to understand how to add an email subscription
form to WordPress Website.
If you have any questions then mention
in the comment section below.
If you like this guide, then please share it
with your friends.
Also, don’t forget to follow us on
social media and subscribe to our newsletter to get all the latest posts directly
in your inbox.
![How to add Email Subscriptions in WordPress[Step by step guide]](https://blogger.googleusercontent.com/img/b/R29vZ2xl/AVvXsEgOZDJ91AZ7TL7bFGGRhLIvnkTLm8Pjcjh5z1L23WrPJ3LLbAsZKeJXd0K0W-bftiexVX2kpvtvFx-GKXj2XIkrydm3QaT4ex5wl81BDaQ6YNyCnB2KUYsoRunB_Hu10ooHueq0YkPNHtIg/w426-h640/How+to+add+Email+Subscriptions+in+WordPress%255BStep+by+step+guide%255D.png)


Post a Comment